Quick Links


Homeowners Guide For Flood, Debris and Erosion Control
Before the Flood: Flood Prevention Strategies
Evaluating Your Property
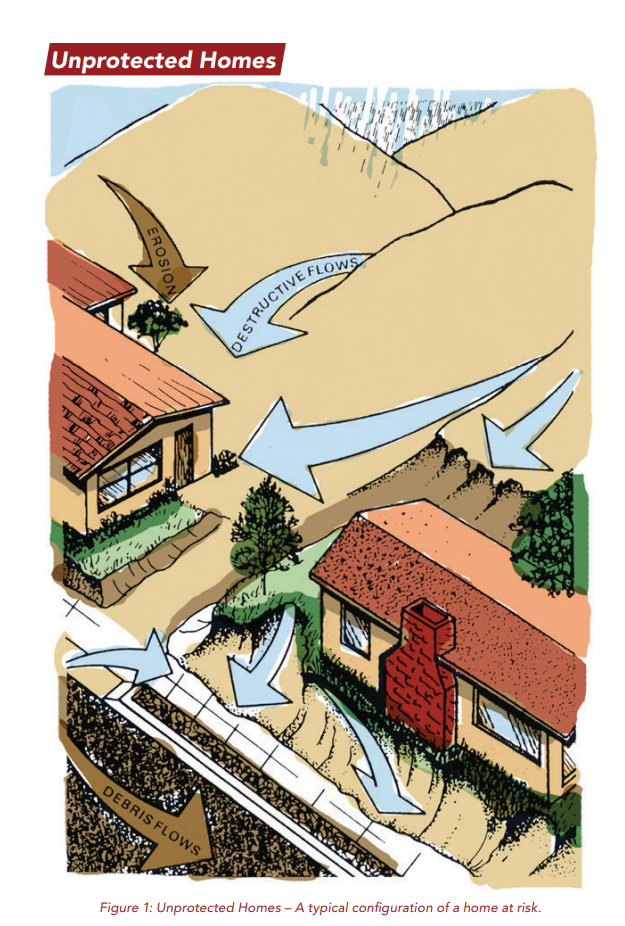
Know your property: identify changes in slope and grade that influence where water and debris flow and collect. Know the over- land escape routes for water/debris, and plan diversions accordingly. Consider low spots and high flow areas when planning for structure and property protection. Also consider escape routes for water and be sure that your efforts to protect your own property do not result in diverting water to a neighbor’s property where it could cause damage there. See Figures 1 and 2 for drawings depicting protected and unprotected properties.
Property Flood Proofing: Drainage Improvements
There are two types of drainage to consider; surface and subsurface. Surface drainage refers to channels, ditches, culverts, walls and other conveyance or diversion methods that move surface water or debris off your property. Sub-surface drainage includes pipes, French drains and sumps which move water under the surface of land. Sub-surface drain- age can be more difficult and expensive to construct but can also result in lower property damage due to surface flooding and soil erosion, or flooded structures. Myths and facts of floods are shown in Figure 3. Carefully evaluate which type of drainage is needed for your property. When designing a drainage system, especially if you are located in a flood prone area, consider consulting a professional such as a civil or geotechnical engineer or a landscape architect.


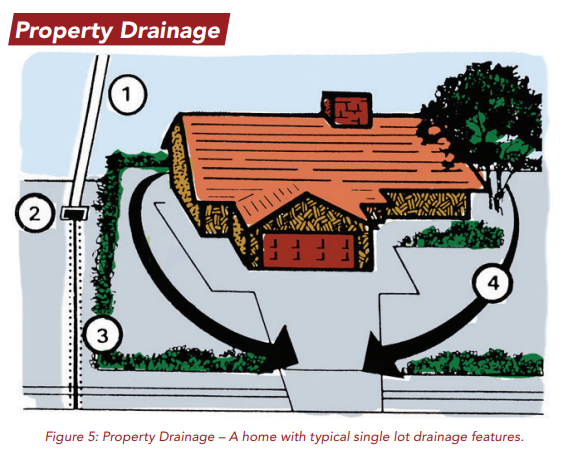
PROPERTY DRAINAGE
➀ Paved terrace drains may extend over several lots, but it is each owner’s responsibility to maintain that portion which is on their property. Keep drainage clean.
➁ Grates and basins should be kept free of silt and debris. Make periodic checks to be sure the grate and outlet pipes are notclogged.
➂ & ➃ Earth berms prevent water from flowing over slopes. It is important that these berms be maintained. Side swales direct water around the house. Keep flow line at least 24 inches from the building wall.
In hillside areas, poorly maintained drainage devices (including slope or bench drains) are the source of many flooding problems. Maintenance of these drains is the responsibility of the homeowner with few exceptions. Keep these drains clear of debris and overgrowth. Blocking may cause undermining and structural failure of the drains or erosion of the hillside. See Figure 4.
A primary design consideration is the location of overland escape routes for water on your property leading to streets or gutters. It is important that your drainage system not overload those escape routes.
Once you have designed and installed a drainage system, be sure that you maintain it and check it periodically during the rainy season to identify and correct problem areas such as leaves clogging a drain or sump.
See Figures 4 and 5 for drawings illustrating drainage improvements.
PREPARING YOUR PROPERTY FOR DEBRIS FLOWS
During a flood, your property can be damaged by water, debris (mud, rocks, branches, etc.) or both. You need to be prepared for the possibility that both could occur. Many of the prevention strategies are the same. The following section emphasizes preparing for debris flows. The section on flood-proofing structures focuses on keeping water out of homes and other structures.
DEBRIS
Don’t underestimate the potential power of debris flows. Begin planning and installation of debris control facilities before the storm season. Start as soon as possible. Protection facilities are not always pleasing to the eye but appearance should not dictate location or type of installations.
Be prepared to personally observe and maintain your installations during storm periods, for in many cases a minor correction will prevent major failure. However, do not take any unnecessary risks.
Should your debris control problems appear to warrant facilities in excess of the type described in this pamphlet; it is recommended that you consult a competent expert such as a civil or geotechnical engineer or landscape architect for additional advice.
DO-IT-YOURSELF DEBRIS CONTROL AIDS
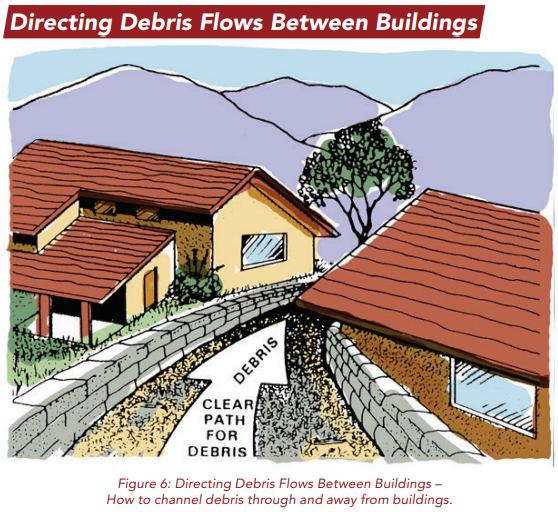
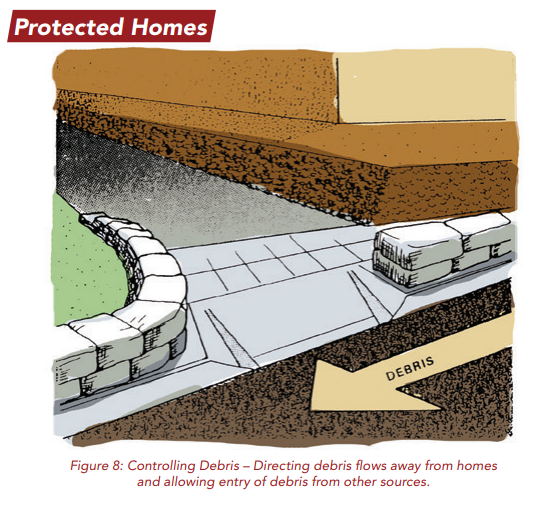
There are a variety of inexpensive ways to control debris flow on your property during a storm. See Figures 6, 7 and 8 for drawings depicting debris flow and control. When compared to the protection received, they are well worth the time and money to install them. Most of the following items can be installed with normal household tools and consist of materials readily available at your local lumber yard. They include lumber, sandbags, sand, and plywood.

SANDBAGS
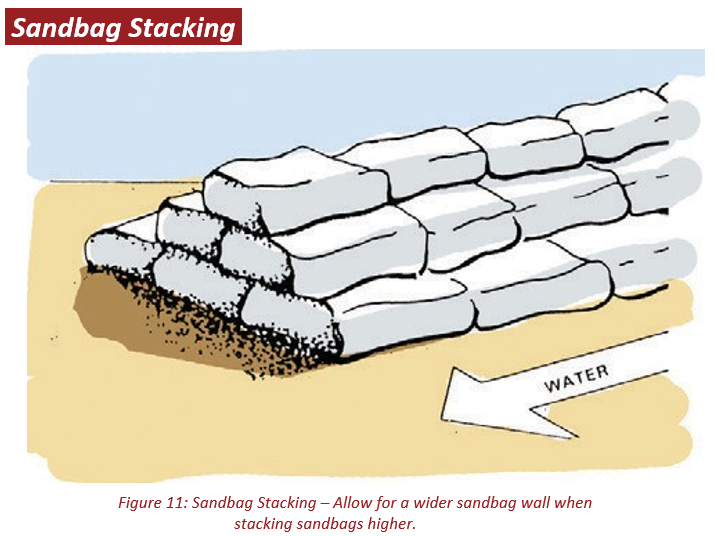
When properly placed , sandbags will redirect water and debris flows away from property improvements. See Figures 9, 10, 11, and 12 for details.
FILLING SANDBAGS
- Fill sandbags half full. Sand is suggested if readily available; however, it is not mandatory, as any local soil may be used.
- Fold top of sandbag down and rest bag on its folded
PLACING SANDBAGS
Care should be taken to stack sandbags in accordance with the photos and illustrations. Place each sandbag as shown, completing each layer prior to starting the next layer. Limit placement to three layers unless a bracing is used as a backing or sandbags are stacked in a pyramidal style as shown in Figure 9.


GENERAL RULES FOR DEBRIS FLOW CONTROL
- Never underestimate the power of any debris
- Try to direct debris flows away from
- Clear a path for the debris.
- Always place protection to deflect debris, not to dam
- Use your house or building as a deflector if
- Avoid trying to confine the flows more than is absolutely
- Debris can enter a building through windows – consider boarding up windows that might be in the path of debris, such as a side of a structure next to a steep
- Remember to protect your home first. Then consider what time and money are available to protect other less valuable objects, such as swimming pools or
- Be prepared to sacrifice portions of your property to achieve good protection.
- Try to work with adjacent affected property owners.
Flood-Proofing Structures
Preventing water from entering a home or structure means assuring that the primary access points (roof, windows, doors, walls and floor/ foundation) are all protected as much as possible. The following information addresses each of these areas.
ROOF AND GUTTERS
Be sure your roof does not leak. A simple inspection by a roofing expert, or observation during a storm of wet areas on the ceiling, should be adequate. A problem point can be near the chimney, where cinder blocks or bricks can leak, leading to infiltration down into the fireplace. Water proof sealing materials are available at most hardware and building supply outlets.
Gutters should be checked every year before the rains to be sure they are clear of leaves and debris, and free of holes, rust or other structural defects. Gutters are the primary means to move excess water from the roof to safe overland escape points; non- functioning gutters can lead to problems. Downspouts should be designed to direct runoff to overland escape points.
WINDOW AND DOOR PROTECTION
It is important to provide protection against water intrusion at possible entry points of a structure, such as doors and windows. Prevent debris from entering doorways and windows with baffle boards. See Figures 13 and 14.
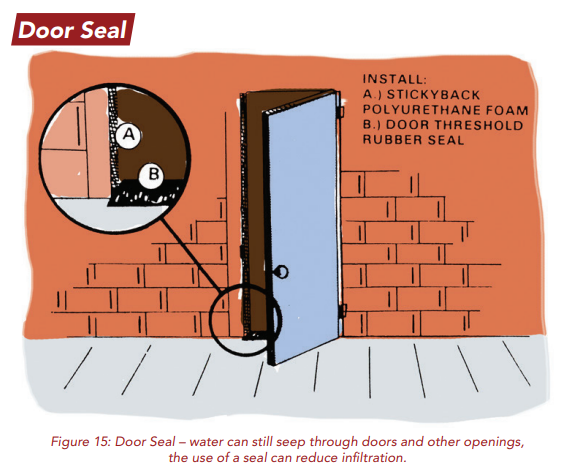
A hazard may require complete closure of a door and necessitate the use of another entrance. To prevent water from seeping through a door, a rubber seal (similar to weather stripping) should be affixed to the door frame. When the door is closed, a watertight seal should result. See Figure 15. To prevent water from seeping through a sliding glass door, a plastic sheet (2 to 3 mils thick) should be placed between the door and the sandbags or between the door and the plywood barrier. See Figure 16. This is not recommended for water levels above two feet.
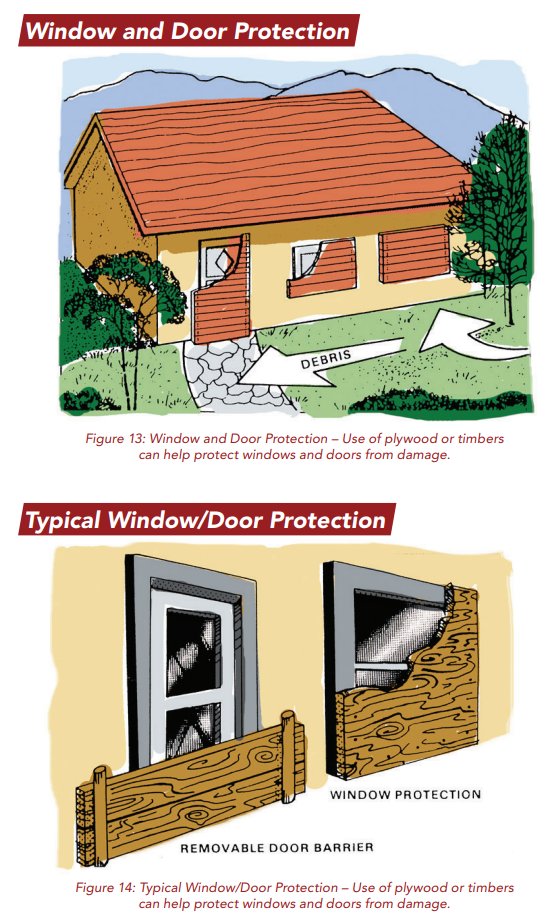
Materials can be dismantled after the storm season and stored from year to year. Use low grade plywood, and overlap windows, vents or doors three to four inches on all sides. Secure the plywood with four or more nails, screws or bolts; a stake and board may also be used to wedge boards in place.

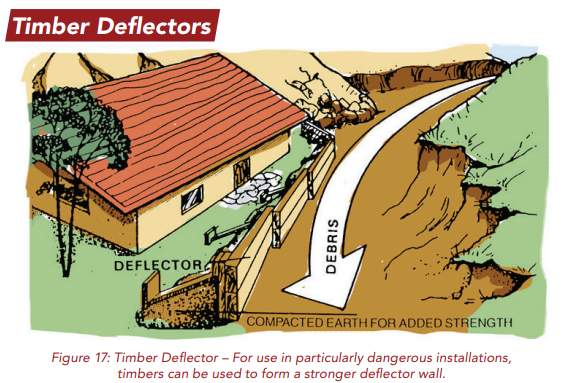
WOODEN DEFLECTORS
A wooden deflector is used outside a structure to deflect debris or water to the best overland escape. See Figures 17 and 18 for detail. Use low grade lumber and overlap sections with protruding face downstream. Drive stakes to at least one half their length to ensure proper anchorage. Place deflectors on solid level soil to reduce the hazard of undercutting. Don’t attempt to use the lumber as a dam.
Earth packed behind the deflector will provide needed additional strength. If the deflector required is more than three feet in height, the house or structure will have to be protected with sandbags and used as a deflector.
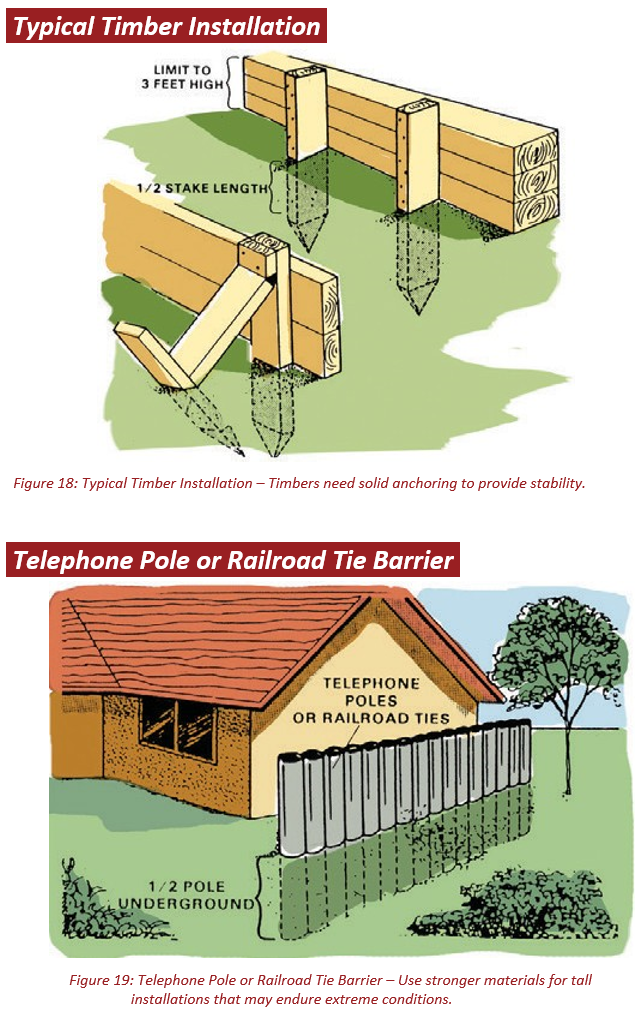

ENGINEERED WALLS
Concrete block and heavy-duty wood walls that are designed and built to withstand loads caused by water and debris are excellent for protection and durability. In many cases, such walls can be adapted to become part of the landscaping. Generally, these walls are expensive and should be considered permanent installations. See Figures 19 and 20.
Caution: Do not rely on walls which have not been specifically engineered for protection.
GENERAL PREVENTION STRATEGIES
- Seal wood with water seal products such as
- Install weather stripping.
- Be sure chimney and vent flashing is
- Clean out culverts and drains near structures to assure clear water
Flood Protection and Erosion Control in Newly Developed Areas
Most newly developed areas lack good coverage from landscaping and ground covers and are therefore more susceptible to erosion. The following tips will help prepare these areas for flooding/ erosion.
1. KEEP WATER AWAY FROM THE AREA TO BE PROTECTED
a. For water flowing onto the property: Dig a small ditch with a hoe or shovel fairly close to the upper edge of the property. The pitch of the ditch should be nearly level to insure slow water Provide for the ditch to drain into a natural watercourse or onto street pavement or to a well vegetated area.
b. For water falling on the property (rain): Dig the same type of small ditch at the top of each steep slope. Do not allow large amounts of water to concentrate along one route. On soils, especially susceptible to erosion, an additional degree of protection can be gained by using inexpensive plastic These sheets should be overlapped like shingles and securely tied or staked down so that the majority of water does not reach the soil at all. Shrubs may be planted through the plastic by cutting a hole just large enough for planting. Where ditches are used in unstable soil, the ditch should be planted with a non-invasive groundcover or sowed with perennial grasses. Check with a local nursery knowledgeable about native plants for suggestions.
2. STRENGTHEN THE SOIL TO RESIST EROSION
a. Straw or wood chips are effective in holding the soil in place. They have the further value of increasing the organic content of the soil. Either material should be worked into the top few inches of the soil. Use a one-inch covering of chips, or less as slope and soil conditions Nitrogen fertilizer should be added.
b.Woven burlap or jute netting can be laid on the slope and tied down properly with stakes to prevent lifting by wind or Regular planting procedures can be followed before laying the burlap, since it will in no way interfere with establishing growth on the slope. The burlap decomposes eventually, but will remain long enough for grasses or plantings to become well established.
Erosion Control in Burned Area
It is especially important to provide adequate protection against flooding and erosion for structures in recently burned areas. Planting in burned areas is similar to planting in newly developed areas. Consult a landscape professional for appropriate ground covers and erosion control techniques. Plant throughout the burned area. It may be necessary to irrigate in order to assure early growth.
Since rains can normally be expected to start in October, plant in the early fall to take advantage of this extra watering.
For more information about soil erosion and prevention, contact the Natural Resources Conservation Service (formally the Soil Conservation Service) at (805) 984-2358 ext. 101, or call a landscape architect or contractor with erosion control experience.
See Figure 21 for a drawing demonstrating techniques to protect areas damaged by fires or other erosion problems.
ADDITIONAL INFORMATION
- Know the location of interceptor ditches on slopes near your home.
- Clean silt and debris from these ditches to prevent overflow of storm waters.
- Remove debris which might obstruct the flow of
- Watch storm drain inlets and culvert entrances in your vicinity.
FIRE AND EROSION
Following a fire, watershed conditions change dramatically. Impacts associated with Fires include:
- A dramatic increase in rainfall runoff velocity and volume,
- Extremely high yields of silt and sediments off hillsides and adjacent properties,
- Potential for debris flows including large rocks and trees,
- Heightened potential for creek overflow and flooding

INDIVIDUAL PROPERTY OWNER
Individual property owners have the responsibility to provide protection to their private property. Property owners should carefully survey their property and identify hazards and the steps to protect their property.
The assistance of technical professionals may be advantageous. Hazards could take the form of hillside erosion from your property, or from your neighbor’s, flooding and debris from denuded properties, and creek overflows.
General Preparation
Learn the safest route from your home or place of business to high, safe ground if you should have to evacuate in a hurry.
Keep a portable radio, emergency cooking equipment, and flashlights in working order.

Persons who live in frequently flooded areas should keep on hand materials such as sandbags, plywood, plastic sheeting, and lumber which can be used to protect property. Remember, sandbags should not be stacked directly against the outer walls of a building, since, when wet, the bags may create added pressure on the foundation.
Flood Insurance
Standard homeowner’s policies do not cover flood loss. You should evaluate the need for flood insurance in your situation, depending on where your property is located. Contact your property/casualty agent or broker about flood insurance, which is offered though the National Flood Insurance Program. Generally, there is a 30- day waiting period for this policy to become effective, so don’t wait until the last minute to apply.
Until the late 1960’s, flood insurance was practically unavailable to home and business owners. Since private insurance firms were unwilling to assume the financial risk alone, Congress voted in 1968 to create the National Flood Insurance Program (NFIP). This federal program provided flood insurance at reasonable cost in exchange for management of flood prone areas by local communities.
Today, you can insure almost any enclosed building and its contents against flood loss, as long as your community is participating in the NFIP. All areas within the county participate in NFIP.
To facilitate submitting claims after a flood, make an itemized list of personal property, including furnishings, clothing, and valuables. Photographs of your home – inside and out – are helpful. This will assist an adjuster in settling claims and will help prove uninsured losses, which are tax deductible.
Remember to keep your insurance policies and a list of personal property in a safe place, such as a safety-deposit box. Know the name and location of the agent(s) who issued these policies.